The Google Cloud IoT driver enables data collected by the PLCnext Edge Gateway to be published to the Google Cloud IoT Core service.
Setting up Google IoT Core
Before being able to connect to the IoT Core, the cloud service will need to be configured.
Creating a Project
The first step in using the Google Cloud IoT Core service is creating a project. At the top of the Google Cloud Platform, click the Project button next to the Google Cloud Platform header.
After a project has been created and IoT Core has been enabled, a registry must be created. A registry will organize and associate IoT Core devices.
At the IoT Core dashboard, click the "Create Registry" button. Give the registry a unique ID/name and select the cloud region where the service will be hosted.
Creating a Device
After a project and registry have been created, devices can be configured. Each device will be uniquely associated with a PLCnext Edge Gateway. From the IoT Core main dashboard, select the registry created in the previous steps. On the navigation tab, select "Devices." At the top of the "Devices" page, click the "CREATE A DEVICE" button. On the next page, the minimum requirement for setting up a device is to give it a unique device ID/name.
Add a Pub/Sub topic to your Registry
Once a device has been added to your registry, the device will need a topic create that it can publish to. From the "Registry details" page, click "Add or edit topics." On the following form, click "Select a Cloud Pub/Sub topic." At the bottom of the drop down, click "CREATE A TOPIC." The topic which must be added is the device ID created in earlier steps. Once the topic is created, click the "UPDATE" button to apply the new topic to your registry.
Generating Certificates
The final step in configuring a device for connection to the Google IoT Core service is to generate certificates which will secure communication between the two. This step is a reiteration of the Google Cloud IoT Core documentation for RSA key generation which can be found below
Google Cloud Platform Key Generation
Prerequisites
In order to generate key pairs, your computer will require the openssl application.
Windows
For installation on Windows, there are many options. One installation link will be listed below, but the process should be the same for any preferred openssl installer. For this walkthrough, we will use the link as provided below at the first link listed - Win64 MSI installer. Follow the installation instructions and note (copy to clipboard) the installation location. For our machine, this was "C:\Program Files\OpenSSL-Win64"

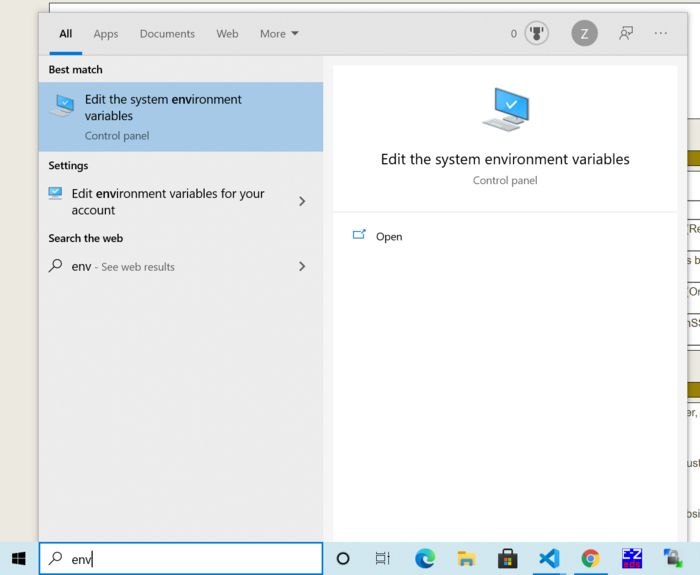
Once the installation is complete, the OpenSSL installation directory must be added to the path environment variable so that the application can be accessed from CMD, the Windows command line application. To do this, type "env" into your Windows search bar.
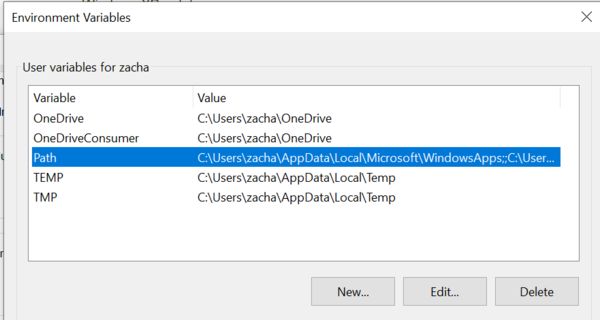
The first result should be clicked - "Edit the system environment variables." From this window, click the "Environment Variables" button. At the top of the "Environment Variables" window, find the "Path" variable for your user account. Double click this item.

ENV User Path
From the next window, "Edit environment variable," click the "New" button. Paste the OpenSSL installation directory into this field and append "\bin" then click "OK." The final path enetered should be, in this example, "C:\Program Files\OpenSSL-Win64\bin" Click "OK" on all of the remaining environment variable windows.
To confirm your installation is working, open the CMD application and type
openssl version
The result should look something like the following
OpenSSL 1.1.1k 25 Mar 2021
Linux
For using OpenSSL on Linux, first check if the application is already installed using the following command from a terminal
openssl version
If the application cannot be found, it can be installed using the following command
apt-get install openssl
Generating Key Pairs
Open CMD or a Shell Terminal as an administrator and navigate to the folder location where you will store the device certificates. Finally, execute the following commands to generate the certificate key pairs
openssl genpkey -algorithm RSA -out rsa_private.pem -pkeyopt rsa_keygen_bits:2048
openssl rsa -in rsa_private.pem -pubout -out rsa_public.pem
Upload Public Cert to Google IoT Device
Once the public and private files have been generated, you must upload the public key to the associated IoT Core device. Navigate to the device generated and click the "AUTHENTICATION" tab. Then, click the "ADD PUBLIC KEY" button and follow the instructions to upload your public key file.

Creating a Connection
Creating a connection to the Google Cloud IoT Platform requires the following parameters, most of which must be collected from your Google Cloud account.
Name
The Name parameter is a unique name given to your connection to the Google Cloud Platform. It is only used inside the PLCnext Edge Gateway for identifying and monitoring your cloud connection on the device.
Project ID
The Project ID parameter is the unique project identifier which the PLCnext Edge Gateway device should be associated with. This can be collected by clicking the project drop down menu at the top fo the IoT Core dashboard. The ID required is listed under the "ID" table column and should be copied by clicking and dragging over the ID text.

Google IoT Core Project ID
Cloud Region
Cloud region of the associated IoT Core registry. On the IoT Core "Registry details" page, copy the "Region" value you had previously configured. In this case "us-central1."

Google IoT Core Cloud Region
Device ID
The Device ID is the unique ID/name created for your PLCnext Edge Gateway. These are listed under the "Devices" tab inside IoT Core.

Google IoT Core Device ID
Registry ID
The registry ID is the unique name/ID give at the time of a registry's creation. Once a registry has been selected inside the IoT Core page, you can review and copy the Registry ID from the "Registry details" tab.

Google IoT Core Registry ID
Private Key
The Private Key required on the PLCnext Edge Gateway Google IoT connection form was generated using the steps listed in the Certificate Creation steps outlined above. Browse for the private key file generated for that device and upload the file
