Sample Workflow (Import from EPLAN Pro Panel)
The following workflow describes the unidirectional data exchange between cxE and EPLAN Pro Panel. cxE provides an import wizard that guides you through the entire data import process step by step.
| Note
The ECAD import wizard is used for all ECAD data import processes. The wizard is used to import ECAD data from ECAD systems (for example, EPLAN Pro Panel or EPLAN Electric P8) or from ECAD files (XML files). Depending on the selected data source, some options may be unavailable or disabled. |
Requirements for the data exchange:
- You have installed the EPLAN add-on (see the section "Technical prerequisites" for details).
- Your EPLAN project contains at least one terminal.
Workflow - ECAD import wizard
To start the ECAD Import Wizard in EPLAN Pro Panel,
- Open the wizard from the Tools tab of the EPLAN ribbon.
- Configure the data exchange settings and start the export process.The selected target application (cxE web application or cxE desktop application) with the ECAD import wizard is started.
Proceed through the steps of the wizard as described below. As you complete each step, click Next to continue. To go to the previous step, click Back. To skip the remaining steps and start the import directly with the default settings, click Skip and import. To exit the wizard without importing data, click Cancel.
Step 1: Import settings
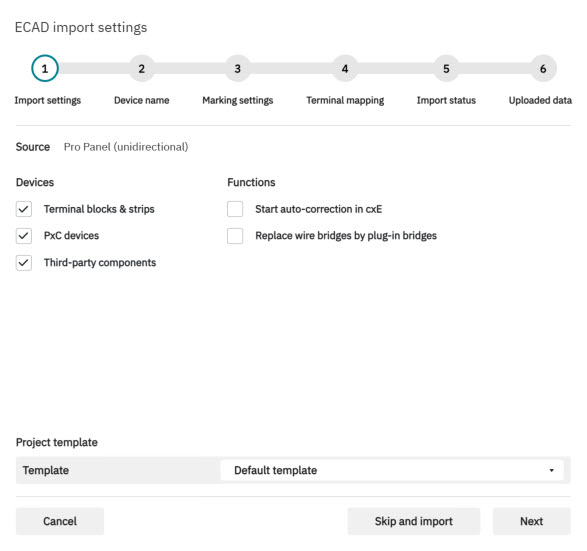
In the first step, define the basic import settings. The Source entry displays the selected data source. In our example, this is Pro Panel (unidirectional). Select the following options:
- Device types to import:
- Terminal blocks and strips: Includes all items classified as terminals, regardless of the manufacturer. Both Phoenix Contact (PxC) terminals and terminals from third-party manufacturers are included in this category.
- PxC devices: Contains all items except terminals that are identified as Phoenix Contact articles. An item is classified as a PxC Device when its article number exists in the cxE item database, and the item is not categorized as a terminal.
- Third-party components: Includes all items except terminals and PxC devices. These are items that do not exist in the cxE item database as PxC articles and are therefore treated as third-party devices.
- Enable additional import functions:
- Start auto-correction in cxE: Starts the auto-correction automatically after the import. The imported project is checked and the required accessories are added to the terminal strips.
- Replace wire bridges by plug-in bridges: Replaces all wire connections defined in the circuit diagram by matching plug-in bridges, based on the relations and the mechanical design of the terminal blocks and bridges.
- Project template: Select the project template to be used for the import. The selected template defines the preset project defaults that will be applied to the imported data. The selection list contains all available custom project templates created on the Options | Project settings page in the backstage area.
Step 2: Device name
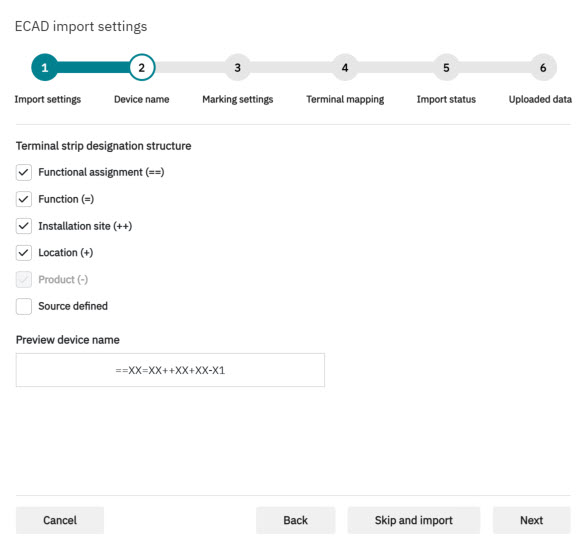
In the second step, define the designation structure for the imported terminal strips.
Select the structure identifiers to be included in the generated device name. The generated device name is displayed in the Preview device name field and is updated automatically when the settings are changed.
Step 3: Marking settings
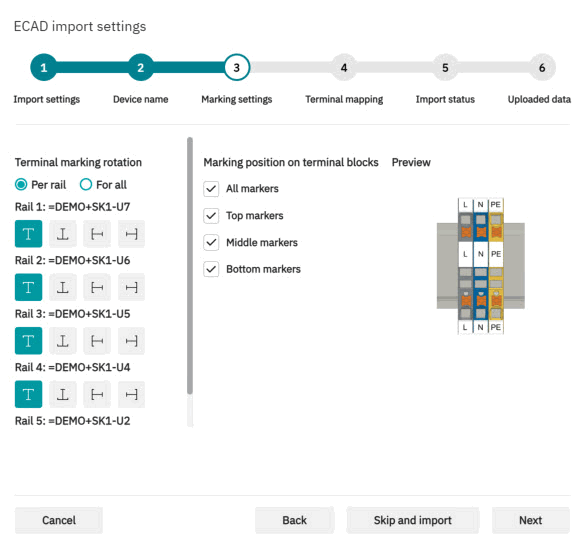
In the third step, define how the markings of the imported terminal blocks are to be displayed.
- Specify the rotation of the terminal block markings either individually for each rail or for all rails. You can set the alignment for each individual rail or all rails using the options provided.
- Determine which marking levels you want to import. The preview on the right displays how the marking positions will look in the final project.
Step 4: Terminal mapping
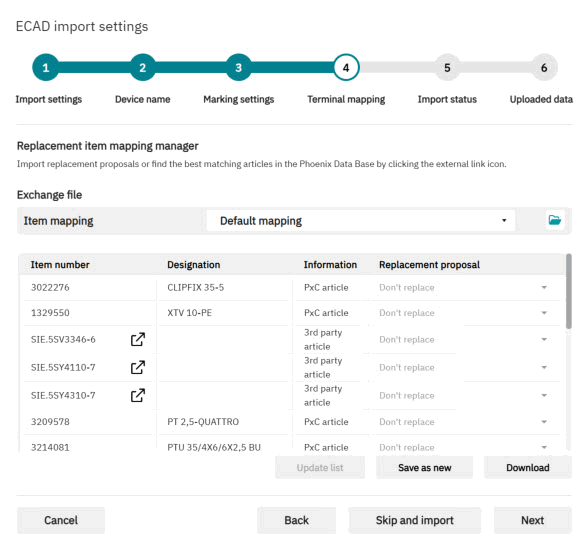
In the fourth step, define the rules for the item exchange by assigning the items contained in the import to matching Phoenix Contact items or optional replacement items.
The Item Mapping Manager displays all items with their item numbers and designations contained in the ECAD export. For each entry, the system indicates whether it is an identified Phoenix Contact item or a third-party item. For third-party articles, click the external link icon to search for suitable replacement items in the Phoenix Contact database.
You can select specific replacement items for individual positions, use a default item mapping list, or load a predefined exchange file that contains project- or customer-specific rules. The specified assignments can be saved as a new exchange list or downloaded for further use.
| Further Info
For details how to create predefined item mapping lists in cxE and the format of the exchange file (Excel file), see the topic "Replacement Item Number Mapping". |
- Exchange file: Select the predefined item mapping list to be used from the selection list or click the open button to load a predefined exchange file (Excel file). The selection list contains all available mapping lists you have created on the Options | Interface settings page in the backstage area.
- Replacement proposal: Select the replacement item that will be used. The selection list contains terminal-type items from the cxE item database.
- Use the following commands to manage the assignments:
- Update list: If you have modified a mapping manually or via a predefined exchange file, click this button to update the mapping list selected in the Exchange file list box. The button is enabled only when changes have been made.
- Save as new: Saves the current mapping as a new item mapping list under a default name and adds it to the Exchange file list box.
- Download: Exports and downloads the current mapping as an Excel file.
Step 5: Import status
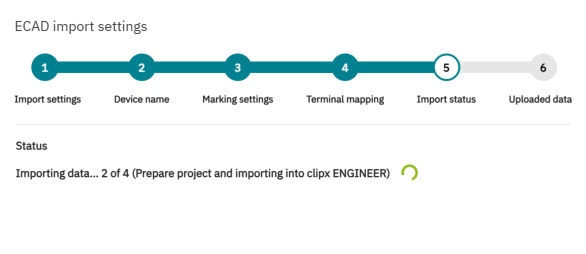
In the fifth step, the current progress of the import process is displayed. While the data is being processed, a status message informs you which subtasks have already been completed and which are still to follow. This typically includes preparing the project, transferring the structured ECAD data to the cxE environment, and applying the previously defined settings.
Step 6: Uploaded data
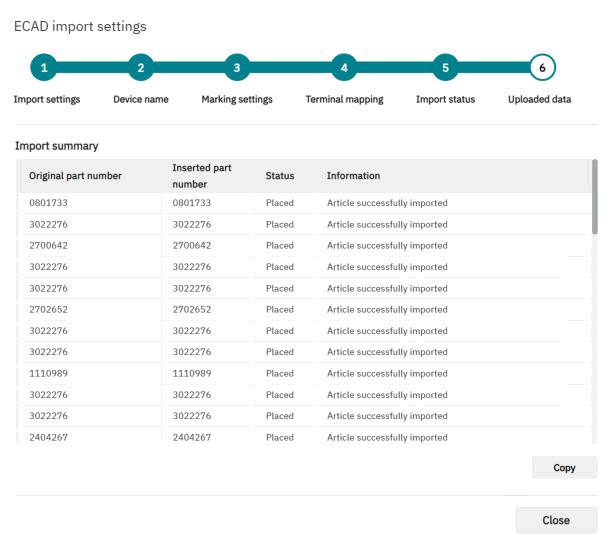
In the sixth step, the import summary is displayed. The summary displays both the original and imported (inserted) item numbers for each transferred component. In addition, the wizard shows the respective import status and additional information, such as whether an item was successfully imported or replaced by a substitute item.
You can copy the list to the clipboard for documentation or post-processing purposes by clicking the Copy button.
To complete the import process and show the import data in the cxE, click Close.