Using the cxE assemble Add-on
Once your project is ready for production and assembly, you can start the assembly process. The cxE assemble add-on navigates you step-by-step through the assembly process. All items that you have configured for your project are placed step-by-step on the mounting rail and put together to form the final product.
This topic contains the following sections:
Default process step order
There is a default order in which the items are placed on the mounting rail during the assembly process. The process starts with the mounting rail, followed by the placement of the terminals, the combination of terminals and covers, the preparation and placement of bridges, and so on. You can change this default placement order on the Properties page of the add-on (you open the page by clicking the properties icon ![]() at the top right in the view; the page can only be opened while the production is not yet started).
at the top right in the view; the page can only be opened while the production is not yet started).
On the Properties | Instructions tab, you can modify the default order. For example, by activating the Prepare Bridges First checkbox, first it is shown how the bridges used have to be prepared (e.g., breaking out contact tabs). For details on the Properties page, see the topic "Setting the cxE assemble Add-on Properties".
Start production
Proceed as follows to start the production process:
- Select the SHOPFLOOR menu item in the ribbon menu to open the cxE assemble add-on view.
- In the project tree on the left, select the mounting rail you want to produce. The mounting rail with the configured items is shown in the 3D viewer.
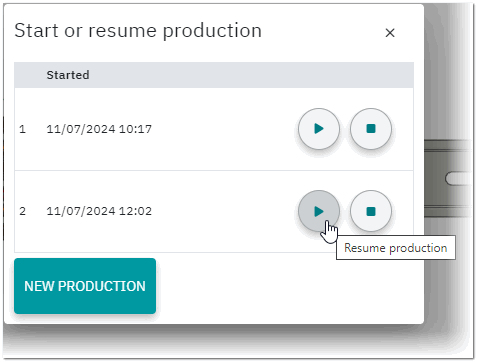
- Click the START PRODUCTION button in the 3D viewer. By default, the mounting rail with the related data such as item name, item number, rail length, etc. is shown (note the description above).If there are productions which have been previously started and interrupted (see below), a dialog appears. The dialog lists all productions with their timestamps you have previously started and interrupted. Here you can either resume an interrupted production (the production will be resumed with the step where you have previously interrupted the production), stop an interrupted production or start a new production. Click the corresponding button to continue.
- Click the CONFIRM button to confirm the current production step and go to the next step. When navigating through the production steps, the following applies:Repeat this procedure to go through all production steps (see also the following section "Operations during production process"). The production steps include the following:
- All items already placed in a previous step are visible.
- The item placed in the current step is highlighted (has the focus).
- Items that were placed in a previous step are greyed-out.
- Placement of all items on the mounting rail.
- Preparation of items such as mounting of terminal blocks with end covers, breaking out contact tabs of bridges or cutting to a specific length, etc.
Note
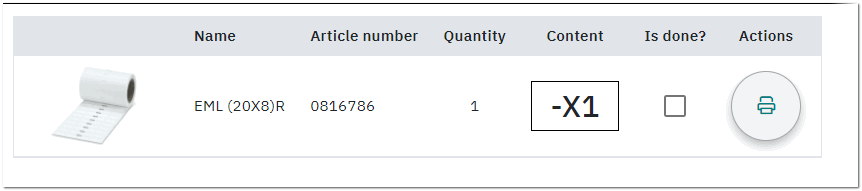
By default, the bridge preparation is enabled. You can disable the preparation of bridges on the Instructions tab of the Properties page (see the topic "cxE assemble Add-on Properties" for details). - Confirm the printing of markings and labels.
If, for example, labels are used in your project, they are displayed with their data including the label content in a separate process step as shown in the following example. Check the Is done? checkbox or click the print button to confirm that you have printed the labels (there is no direct printing from the add-on).
- When the last process step is reached (all items are placed and prepared) and you click the CONFIRM button, a complete message is shown in the status bar.


Operations during production process
There are several operations that you can perform during the production process. Each operation is controlled by a button in the add-on view. The following operations (buttons) are available:
| Operation / Button | Description |
|---|---|
| Previous step | Goes back one step in the production process. The item placed in the "selected" step is highlighted (has the focus). (Not available if the production is at the first step.) |
| Next Step | Goes forward one step in the production process. The item placed in the "selected" step is highlighted (has the focus). (Not available if the production is at the current step.) |
| Jump to current | Jumps to the current production step. |
| Interrupt production | Interrupts (pauses) the production process (can be done at any time during production). A dialog appears where you have to confirm the operation. The production will be interrupted (and saved) at the production step you are at the moment.An interrupted production process can be resumed and continued. If there are interrupted productions, clicking the START PRODUCTION button in the 3D viewer shows the list of all productions with their timestamps you have previously started and interrupted. Clicking the Resume production button continues the production with the step where you have interrupted the production.
 Example Example
|
| Stop production | Stops the current production. A dialog appears where you have to confirm the operation. The production will be stopped and cannot be resumed afterwards. |