Workspace Buttons
The toolbar at the top right side of the workspace provides the following buttons:
| Buttons | Description |
 | Buttons from left to right:
(The buttons are also available in the VIEW > 3D VIEWER ribbon.)
-
Fit to windowZooms in or out so that all objects are displayed in the entire workspace. When zooming the previous view direction and rotation are not changed.
-
Fit view to selectionFits the selected objects to the size of the current workspace. The objects are zoomed so that all selected objects are visible.
-
Center by selectionPlaces the selected objects in the middle of the workspace. (The zoom will not be changed.)
|
 | Rotate/Select/Move
 Freezes the image and the rotation. The pointer can be used for selection, drag & drop, etc. Freezes the image and the rotation. The pointer can be used for selection, drag & drop, etc.
(Button turns green when selected.)
 Turns on rotation – moving the mouse pointer rotates the image Turns on rotation – moving the mouse pointer rotates the image
Note
To rotate the display, click an empty area within the workspace and start moving the pointer. |
|
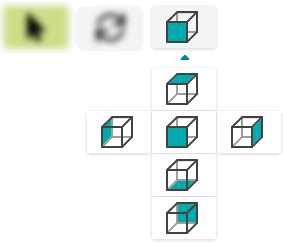 | View perspective
 Displays the configuration in front view.No matter which perspective you have selected, with this workspace button you can always switch back to the front view. Displays the configuration in front view.No matter which perspective you have selected, with this workspace button you can always switch back to the front view.
Note
Keeping the ALT key pressed while selecting a view will keep the menu open, so you can quickly switch between different views. |
Click the arrow
below the icon to
select a
perspective other
than the front
view.
Note
You can also use the VIEW > PERSPECTIVE ribbon to switch between perspective and orthographic view. In the perspective view, the objects that are far away look smaller than the objects nearby. In orthographic view, all objects are displayed according to their size. |
|