Inserting Terminal Strips/Terminal Blocks
A terminal strip is a combination of individual terminals. Terminal strips are numbered subsequently in the order of creation. They are also displayed in the project tree as a child node of the mounting rail node.
This topic contains the following sections:
- Insert a terminal strip
- Select a terminal strip
- Split a terminal strip / Create a terminal strip from a split strip / Merge terminal strips
Insert a terminal strip
You have the following possibilities to insert a terminal strip:-
Via the ribbon:
HOME > INSERT | Terminal strip
Click the button and then click the mounting rail to position the strip there. The application automatically places a matching end clamp and marker carrier on the rail.You can now add terminal blocks from the Insertion Center.
Note
You can specify the default terminal strip inserted via the ribbon button in the backstage area in the Options | Project settings section from the End brackets dropdown list under the Terminal strip group. -
Via the radial menu (right-click to open the menu). The terminal strip is attached to the mouse cursor until you drop it on a mounting rail. Inserts a default terminal strip (see note above).

- Via the Insertion Center (Articles category). The terminal strip is positioned on the mounting rail selected in workspace.
- By inserting terminal blocks If you insert a terminal block (via the Insertion Center) while the mounting rail is selected, the blocks are added as a new strip. In this case, you need to add the missing end clamps and marker carrier manually/via auto-correction.
Select a terminal strip
To select a terminal strip and all its elements, click the terminal strip frame (is shown above the terminal strip) in the workspace or select the terminal strip in the project tree.
Split a terminal strip / Create a terminal strip from a split strip / Merge terminal strips
For terminal strips, you can apply the following operations:
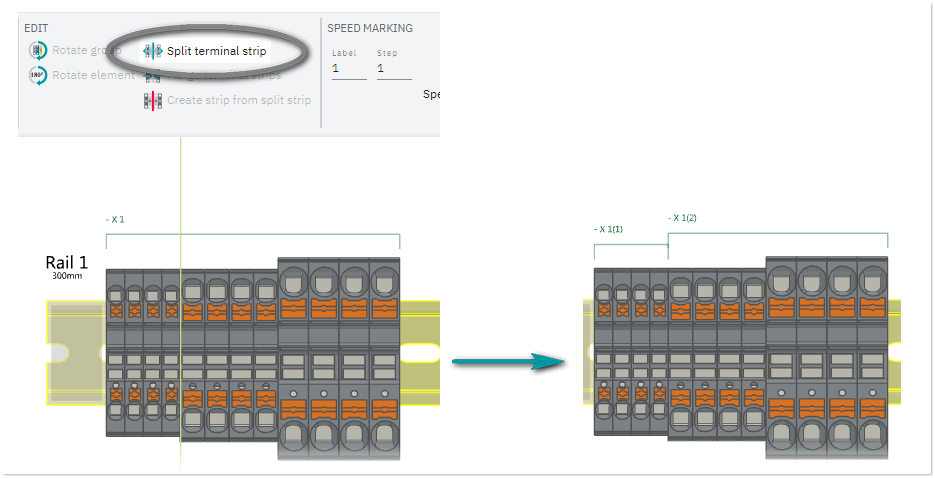
- Split a terminal stripTo split a terminal strip (group of elements) into several groups, select the ribbon HOME > EDIT | Split terminal strip (splitting line is added to the mouse cursor). Place the splitting line on the position where you want to split the group and press the left mouse button.
Note
The parts (groups) of the terminal strip have the same ID (X1 in the following example). - To create independent terminal groups from a split group (see the procedure above), select the groups and click HOME > EDIT | Create strip from split strip.
- To merge two or more terminal strips to one terminal strip, select the terminals strips and click HOME > EDIT | Merge terminal strips.
 Example