Sample Workflow
The following workflow shows how the bidirectional data exchange between cxE and
EPLAN Electric P8 can be implemented. Depending on your business setup, you might change the steps and settings according to your requirements.
Bidirectional data exchange with EPLAN Electric P8
Note
You can only start this workflow if you have the required add-on installed for the EPLAN application (see the general information). |
| Step | EPLAN Electric P8 | cxE |
| Export data from ECAD |
- You open the data exchange wizard in the EPLAN P8 project:
- In the wizard...:
- Select the Electric P8 option.
- Configure the export settings (for example, whether you want to re-import the changed data into EPLAN, how data should be processed and completed in cxE).
- Select the devices to be exported to cxE.
- You start the export.
|
-
|
| Edit data in cxE | All selected devices are exported from the ECAD application and uploaded to cxE. The data exchange window remains open and displays the current status.
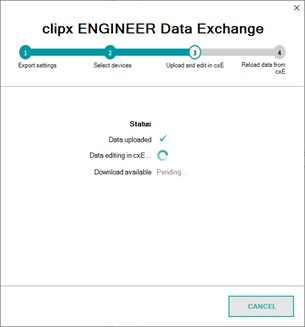 |
- A new project is opened in the cxE instance that you have selected in the export settings.The project name is that of the ECAD project.The imported terminal strips are displayed on individual mounting rails. Articles that are not available in the database (non-
Phoenix Contact
articles) are displayed as 3rd party articles based on the imported properties.
- The new ribbon tab EPLAN ELECTRIC P8 is available for sending back the changed data or decoupling the cxE project from the ECAD system.
Note
The ribbon tab is only available if the check box Import data from cxE after editing is activated in the export settings. |
- If selected, auto-correction starts automatically and checks the imported data.
- You make the required changes to the project (see the list of possible changes).
|
| Send data back to ECAD | The data exchange window shows that data is available for import (step Reload data from cxE).
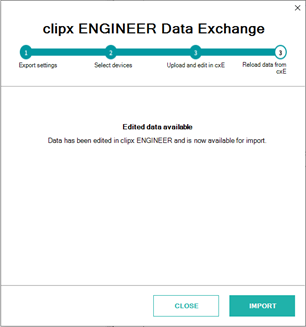 | You click the Send button in the ECAD ribbon to send the data back to the ECAD system.
You can select, which of the devices/terminal strips you want to send back. |
| Import data into ECAD | You click the IMPORT button to load the changed data.Data is imported into the ECAD project.
Note
If you have added articles that are unknown to the ECAD application, you can directly add the data during import if you provide your data portal token. The data exchange wizard will guide you through the necessary steps. |
| The project remains open, but the ECAD-specific ribbon is not visible anymore. |
| Data is available in the ECAD application | Data exchange is finished:
- Any added accessories are added to the article list of the respective terminal block.
- Completely new terminal strips are available as unplaced elements.
- Added/changed articles are visible in the article list.
- Added plug-in bridges are visible in the connection list and as terminal block accessories.
| The project remains open, but the ECAD-specific ribbon is not visible anymore. |